前言
这一期我们准备做一个基于VUE3.0 Composition API与FireBase的在线聊天室
用户登陆到我们的在线聊天室进行聊天
前期准备
命令行中利用vue-cli创建vue3.0项目

选择手动添加Manually select features
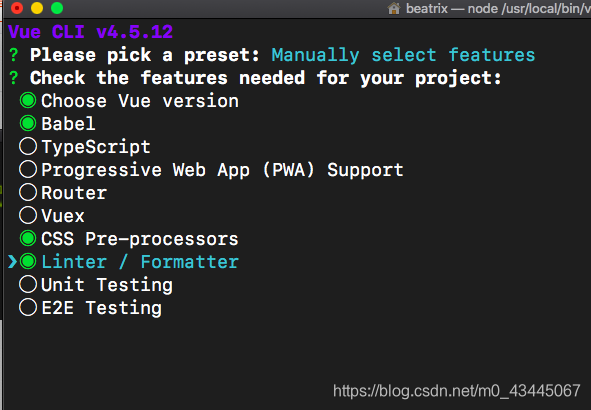
选择上述勾选项
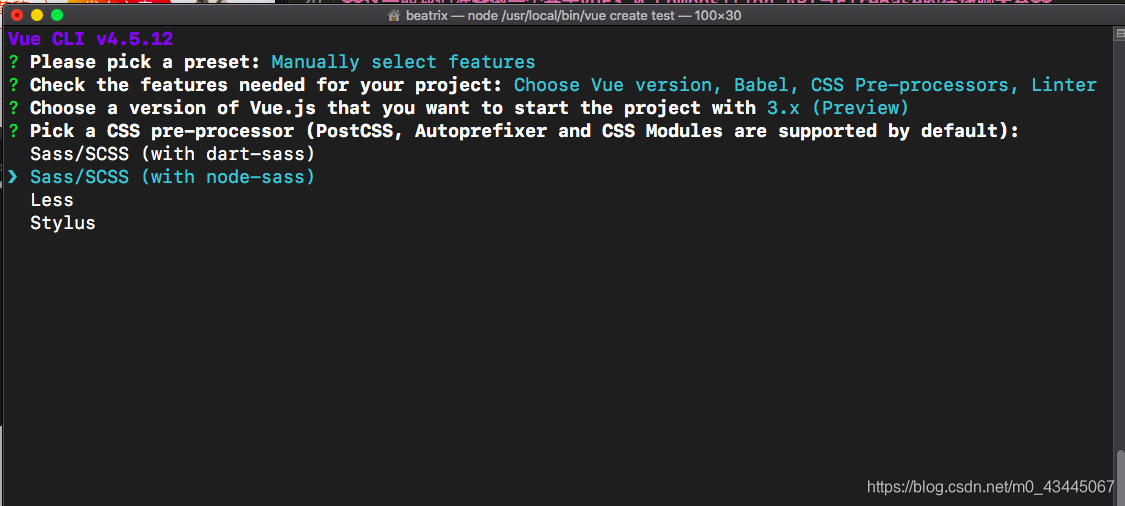
接下来,选择3.x(preview)因为要用到VUE的composition API
选择with node-sass,如下图所示:
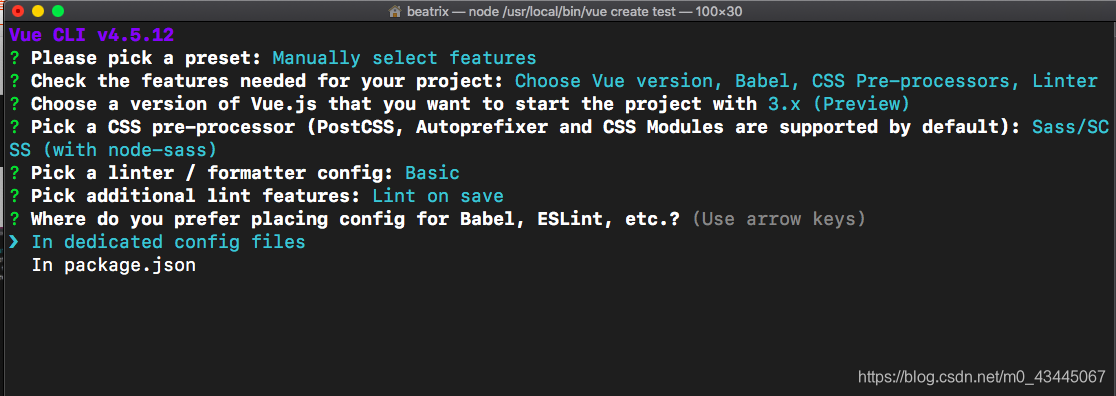
然后一直enter即可,直到出现package.json,如图所示:
选择In package.json
出现preset选项,选择否 not save
然后经过漫长的等待…
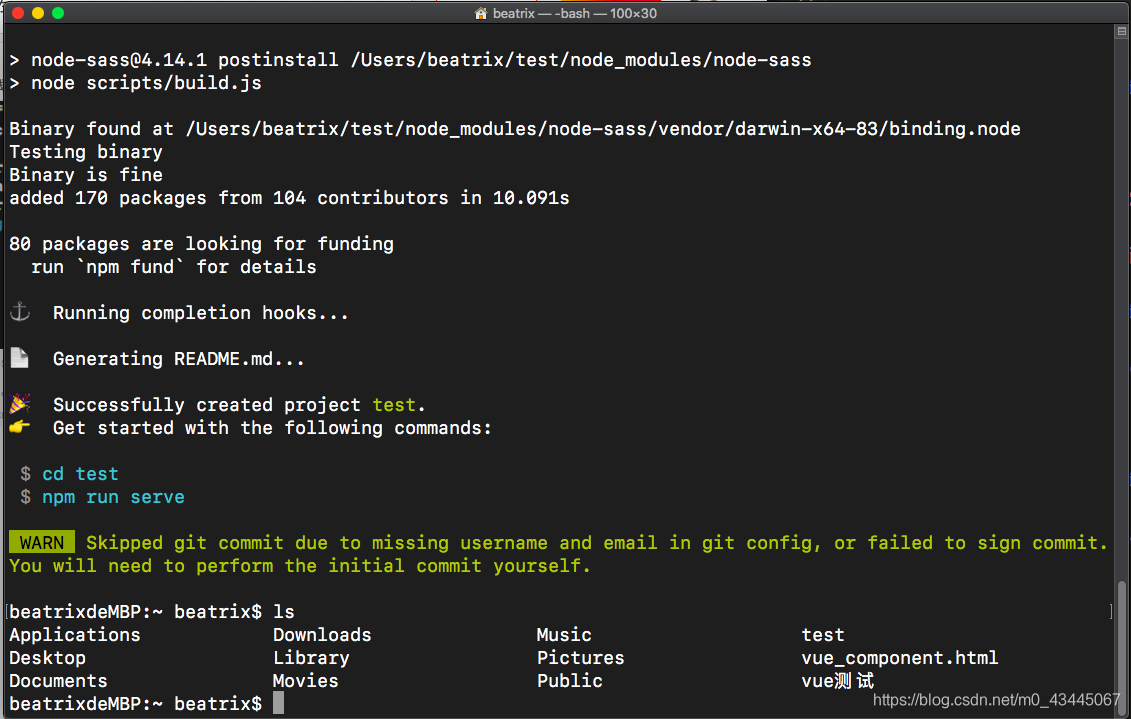
如果一切顺利,那么会出现下图所示:
1
2
3
4
5
| Successfully created project test.
Get started with the following commands:
$ cd test
$ npm run serve
|
cd 切换到这个新项目的工作目录。
这个时候我们要安装Firebase数据库用于聊天室中所有消息的存储
- 注意,Firebase由Google创建并持续维护,安装前请科学上网 ✈ ️
目前为止,我们的前期工作就已经做好了!
然后利用VS Code或者IDEA等编译器导入这个VUE项目即可
配置项目的数据库Firebase
首先,我们需要修改一个配置信息
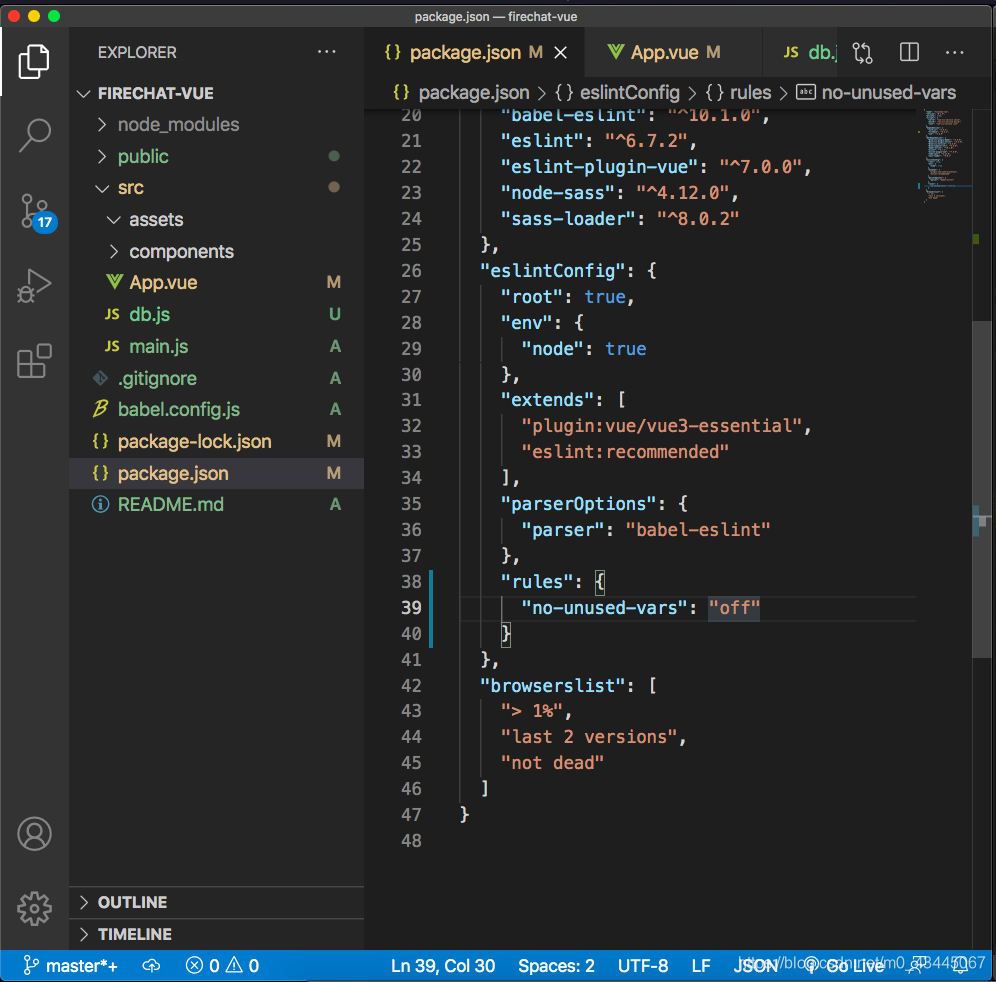
打开package.json 在”rules”中添加:
因为在做一些初始配置,所以演示的时候,可能会因为定义了未被使用的变量而报错。
Src 目录下创建db.js firebase配置数据库信息

进入db.js
输入以下备用代码:
1
2
3
4
5
6
7
8
9
10
11
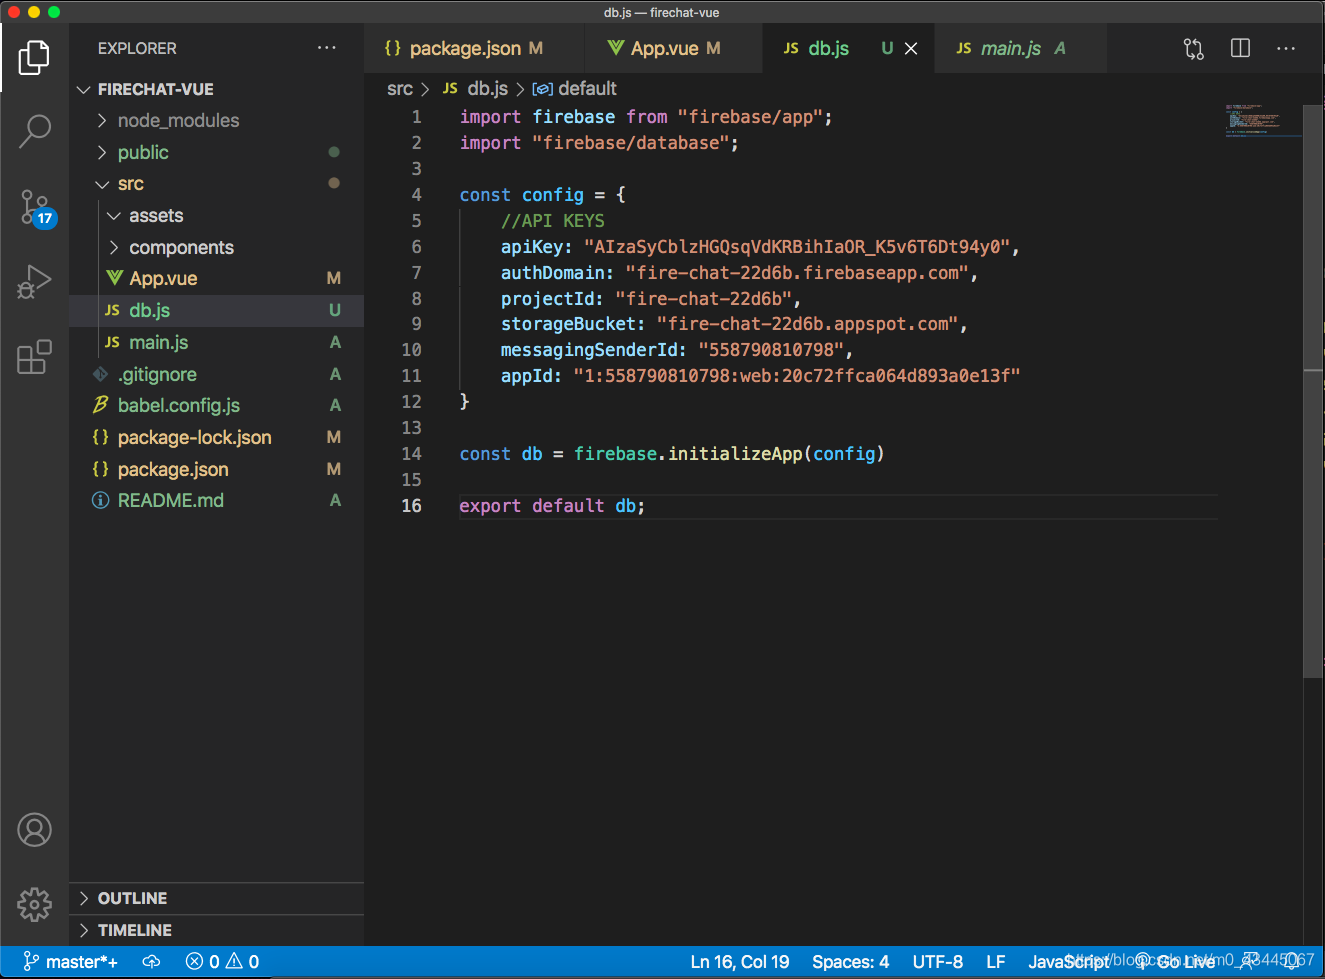
| import firebase from "firebase/app";
import "firebase/database";
const config = {
}
const db = firebase.initializeApp(config)
export default db;
|
这里注意到,我们的config中还没有配置我们firebase的接口信息(包括你这个应用的KEY、用户KEYS、项目ID等等)
因此,接下来我们要去firebase的官网配置:
点击右上角的转到控制台
点击添加项目并输入项目名称
取消勾选“为此项目启动 Google Analytics分析”
等待正在创建项目…

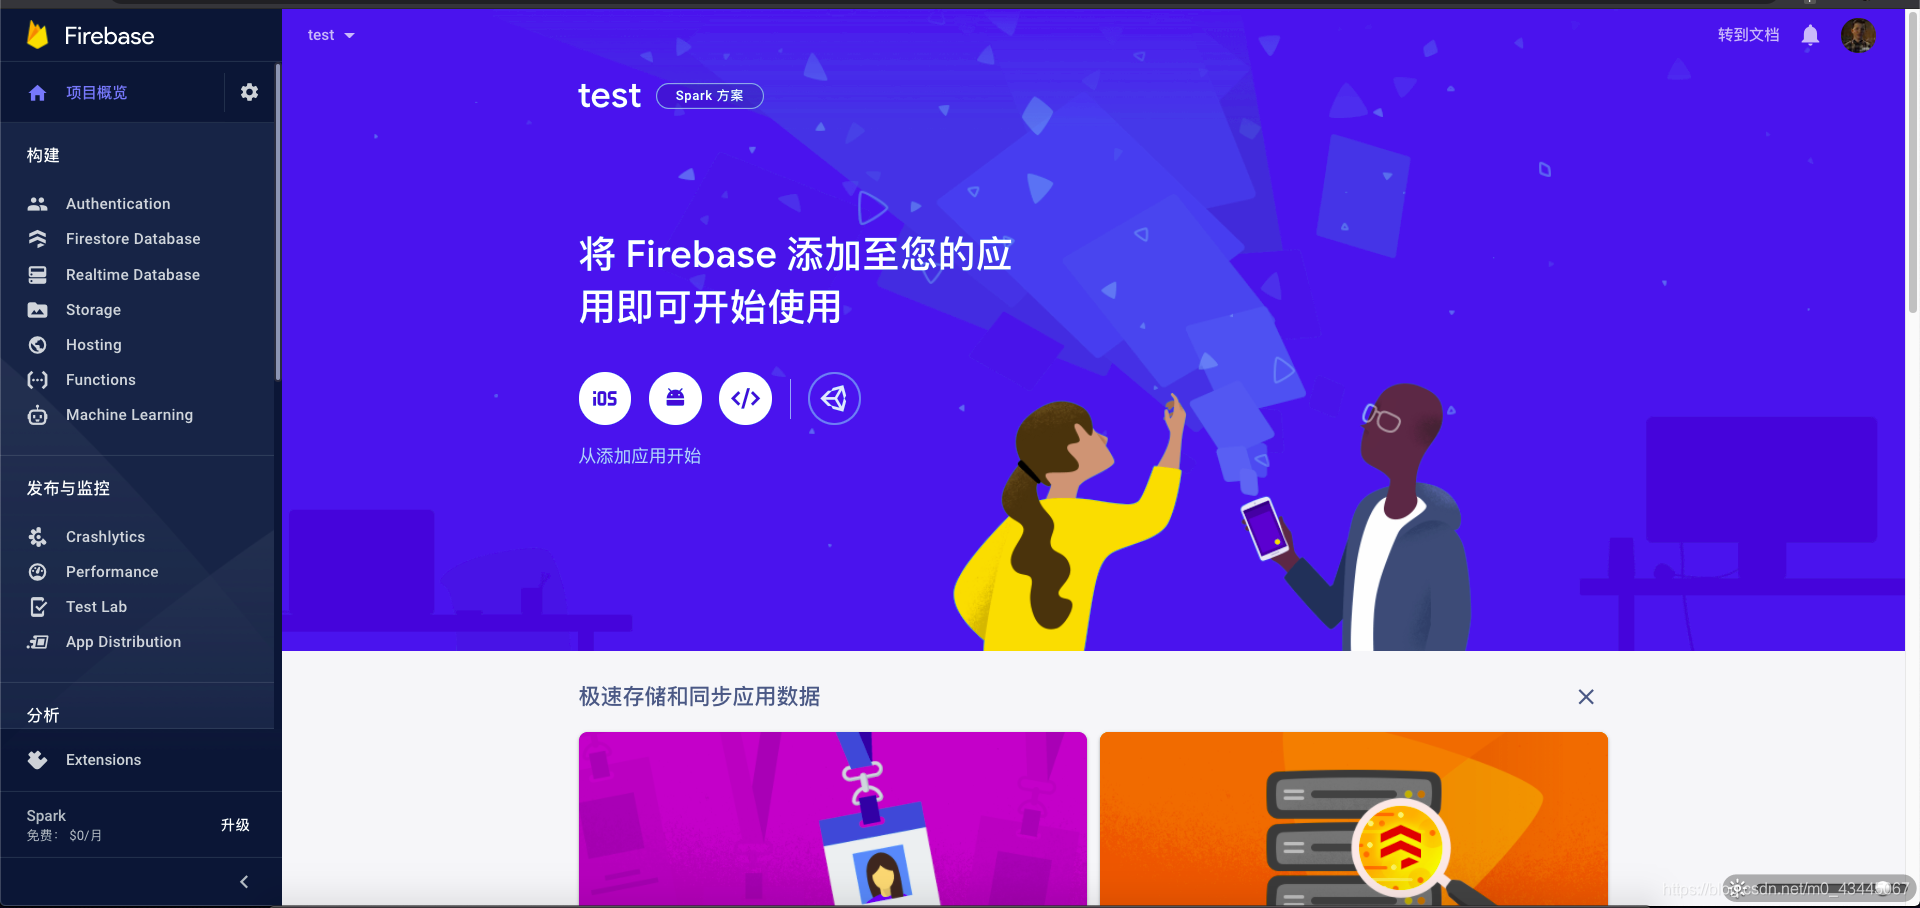
- 点击对应的项目名,顺利的话,会进入以下画面:
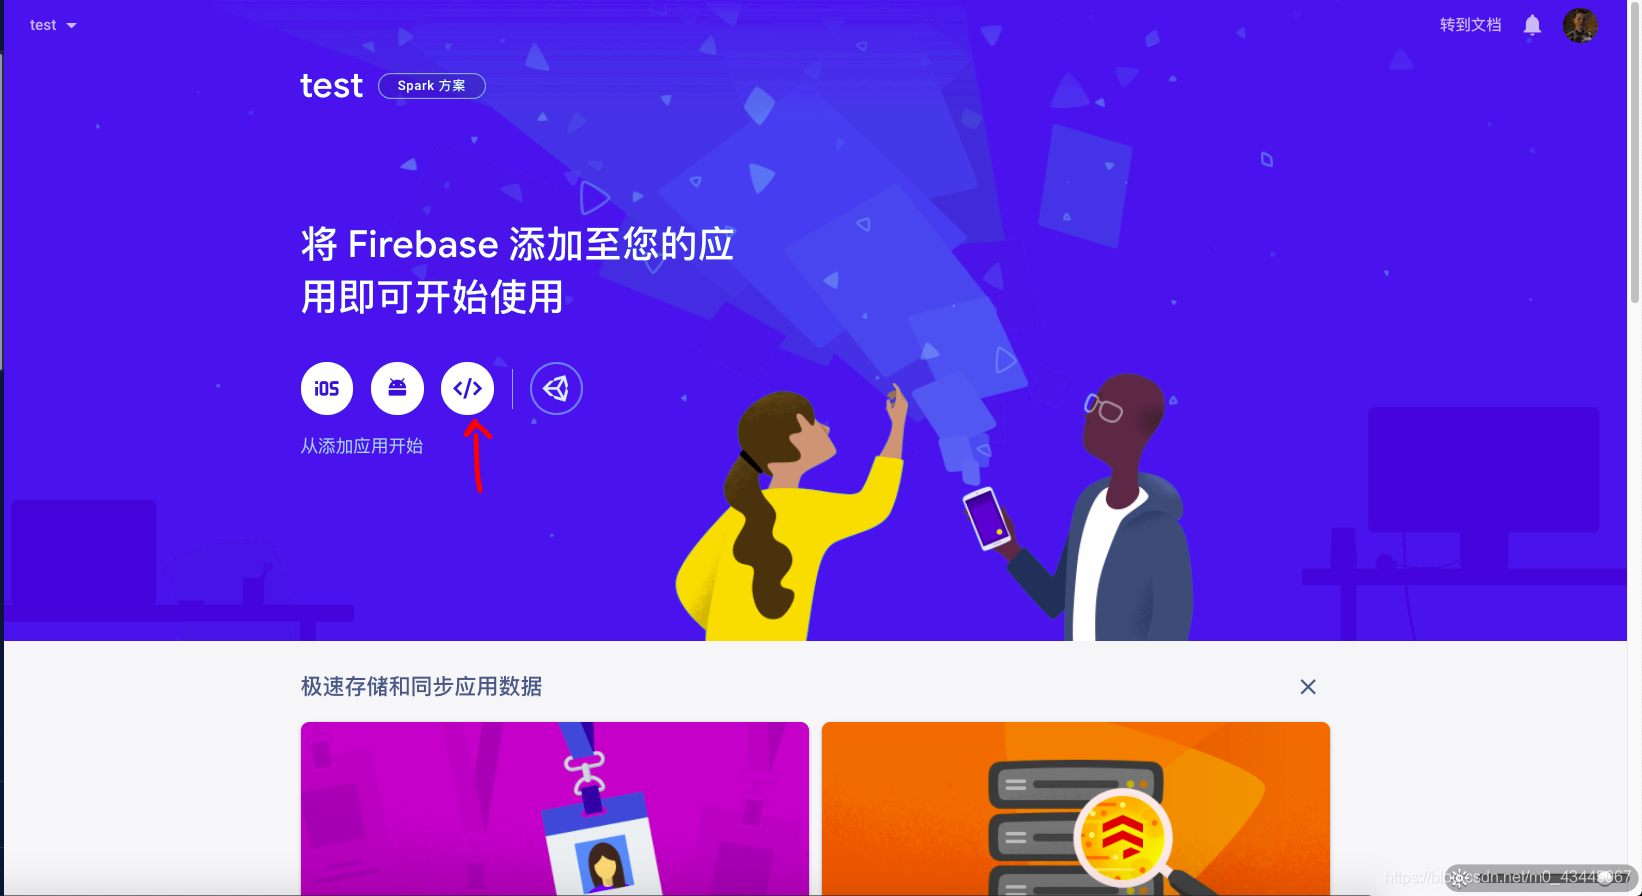
- 添加网页端应用,并获取到应用接口信息
- 输入我们的应用别名,注册应用后,可以获得Firebase SDK (下图所示)
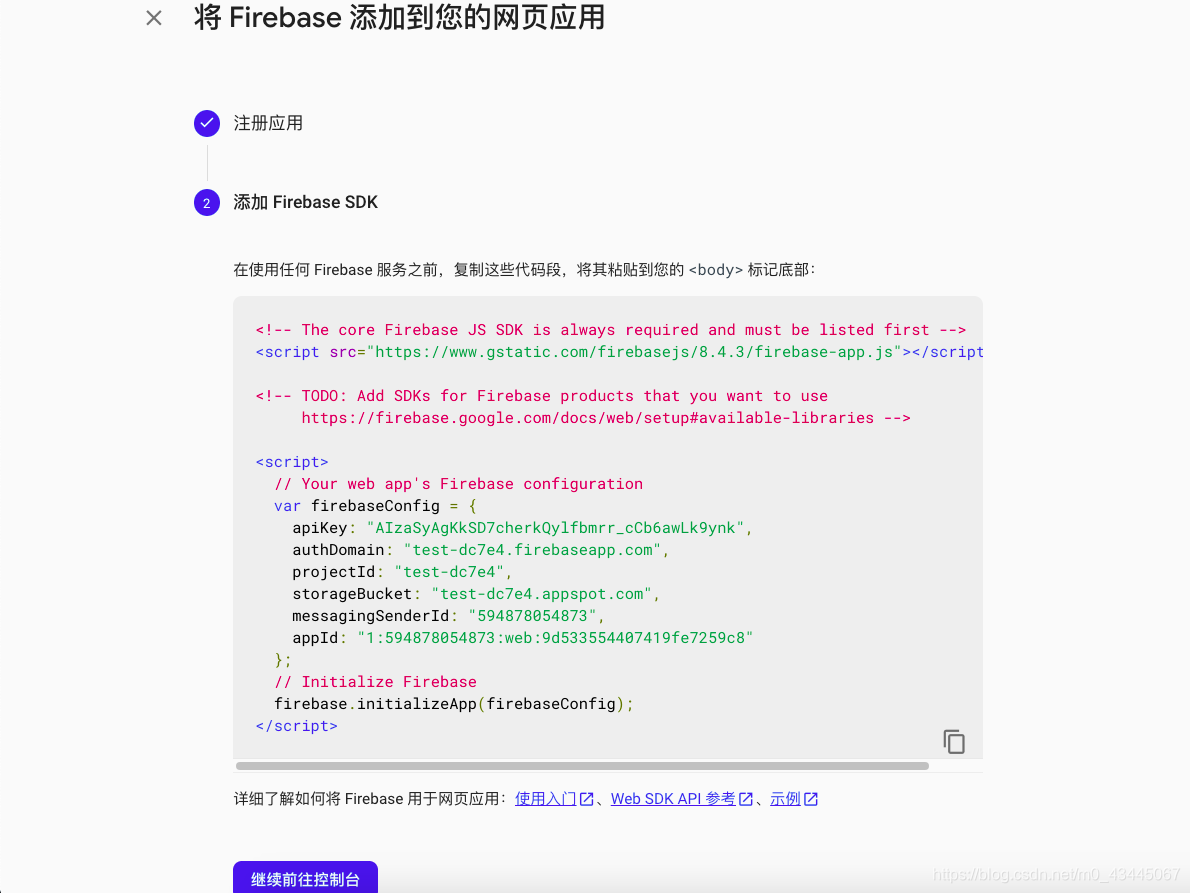
由于我们已经在项目中 预先安装了firebase 那么就不用最上面的JS引入语句了
JS文件内容如下:
1
2
3
4
5
6
7
8
9
10
11
12
13
| <script>
var firebaseConfig = {
apiKey: "AIzaSyAgKkSD7cherkQylfbmrr_cCb6awLk9ynk",
authDomain: "test-dc7e4.firebaseapp.com",
projectId: "test-dc7e4",
storageBucket: "test-dc7e4.appspot.com",
messagingSenderId: "594878054873",
appId: "1:594878054873:web:9d533554407419fe7259c8"
};
firebase.initializeApp(firebaseConfig);
</script>
|
我们需要将firebaseConfig中的内容粘贴到,我们的db.js中去:
我的配置信息如下图所示:
- 配置实时数据库 RealTime Database
这一步,是为了查看聊天室中的实时存储的消息。
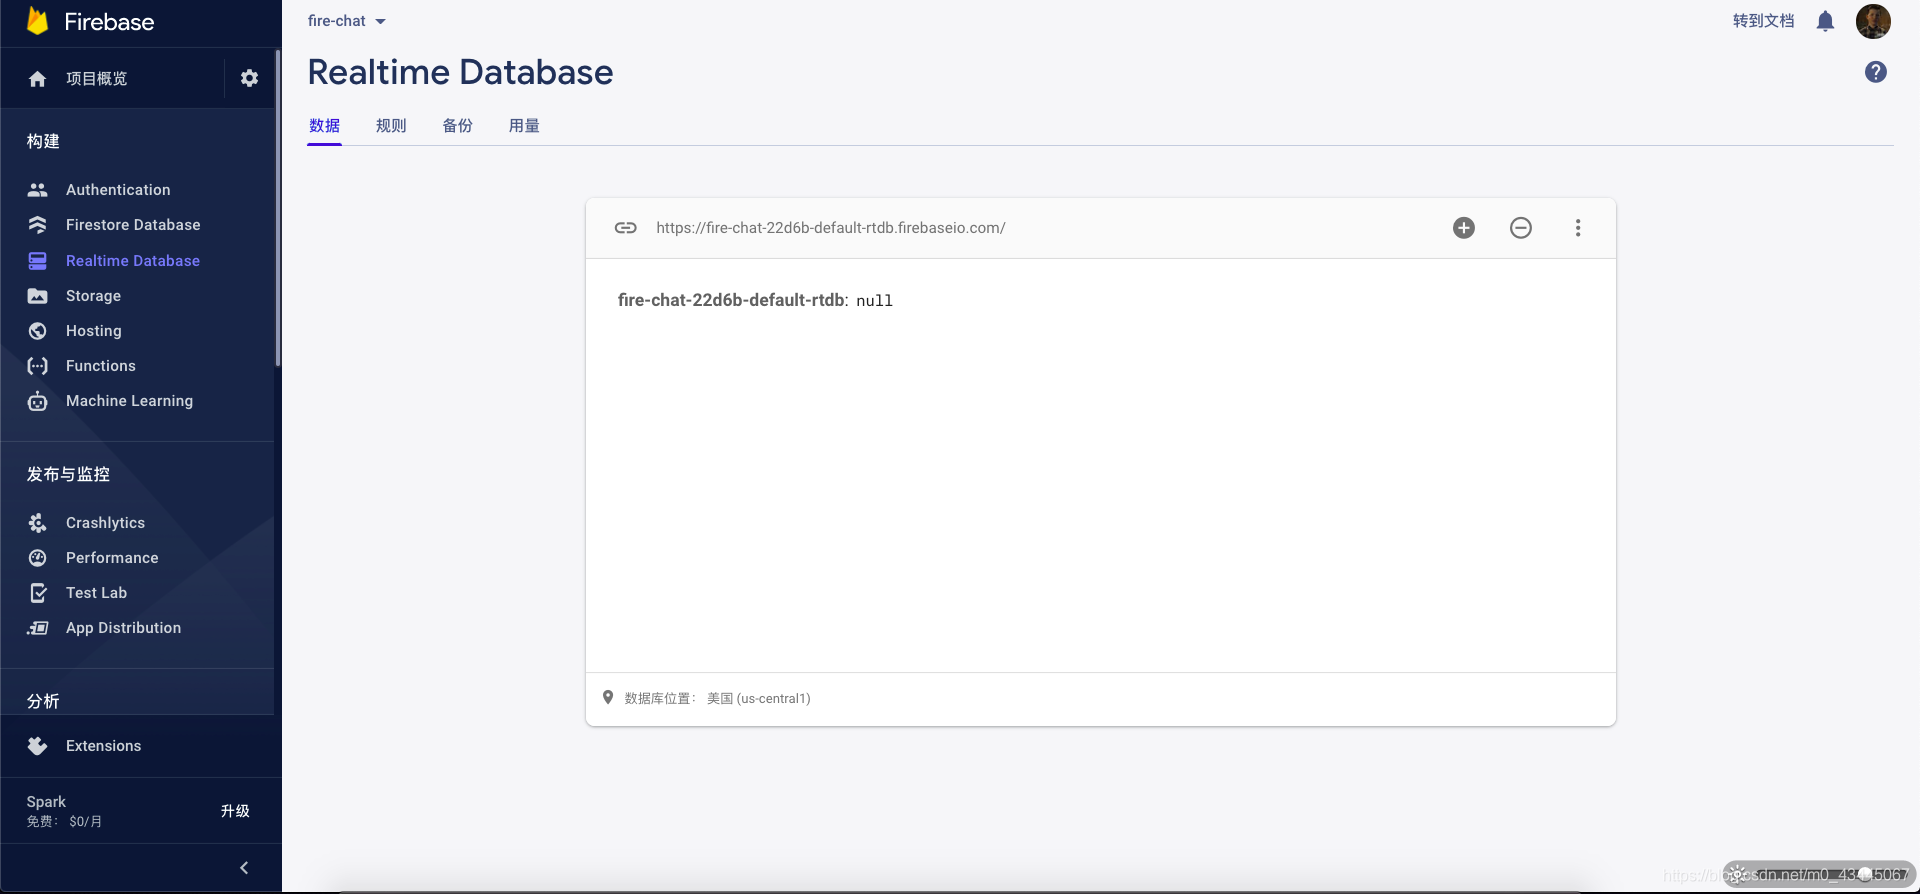
导航栏左侧的Realtime Database实时数据库 一步步创建即可
那么,到目前为止,数据库配置信息完成了。
进入项目
页面的样式添加
进入初始话的文件,我们将没用的初始文件都删掉:component以及assets中的内容
进入APP.vue中,写好初始页面:
1
2
3
4
5
6
7
8
9
10
11
12
13
14
15
16
17
18
| <template>
</template>
<script>
export default{
setup(){
return{
}
}
}
</script>
<style lang="scss">
</style>
|
我们可以发现,与VUE2.0不同的是,我们使用setup来配置初始化信息,并且在初始化之后,return这些信息,让前端页面任何地方可以引用这些数据(比如用于v-model)。
接下来,将以下样式贴到style中:
1
2
3
4
5
6
7
8
9
10
11
12
13
14
15
16
17
18
19
20
21
22
23
24
25
26
27
28
29
30
31
32
33
34
35
36
37
38
39
40
41
42
43
44
45
46
47
48
49
50
51
52
53
54
55
56
57
58
59
60
61
62
63
64
65
66
67
68
69
70
71
72
73
74
75
76
77
78
79
80
81
82
83
84
85
86
87
88
89
90
91
92
93
94
95
96
97
98
99
100
101
102
103
104
105
106
107
108
109
110
111
112
113
114
115
116
117
118
119
120
121
122
123
124
125
126
127
128
129
130
131
132
133
134
135
136
137
138
139
140
141
142
143
144
145
146
147
148
149
150
151
152
153
154
155
156
157
158
159
160
161
162
163
164
165
166
167
168
169
170
171
172
173
174
175
176
177
178
179
180
181
182
183
184
185
186
187
188
189
190
191
192
193
194
195
196
197
198
199
200
201
202
203
204
205
| * {
font-family: Avenir, Helvetica, Arial, sans-serif;
-webkit-font-smoothing: antialiased;
-moz-osx-font-smoothing: grayscale;
margin: 0;
padding: 0;
box-sizing: border-box;
}
.view {
display: flex;
justify-content: center;
min-height: 100vh;
background-color: #ea526f;
&.login {
align-items: center;
.login-form {
display: block;
width: 100%;
padding: 15px;
.form-inner {
display: block;
background-color: #FFF;
padding: 50px 15px;
border-radius: 16px;
box-shadow: 0px 6px 12px rgba(0, 0, 0, 0.2);
h1 {
color: #AAA;
font-size: 28px;
margin-bottom: 30px;
}
label {
display: block;
margin-bottom: 5px;
color: #AAA;
font-size: 16px;
transition: 0.4s;
}
input[type="text"] {
appearance: none;
border: none;
outline: none;
background: none;
display: block;
width: 100%;
padding: 10px 15px;
border-radius: 8px;
margin-bottom: 15px;
color: #333;
font-size: 18px;
box-shadow: 0px 0px 0px rgba(0, 0, 0, 0);
background-color: #F3F3F3;
transition: 0.4s;
&::placeholder {
color: #888;
transition: 0.4s;
}
}
input[type="submit"] {
appearance: none;
border: none;
outline: none;
background: none;
display: block;
width: 100%;
padding: 10px 15px;
background-color: #ea526f;
border-radius: 8px;
color: #FFF;
font-size: 18px;
font-weight: 700;
}
&:focus-within {
label {
color: #ea526f;
}
input[type="text"] {
background-color: #FFF;
box-shadow: 0 0 6px rgba(0, 0, 0, 0.2);
&::placeholder {
color: #666;
}
}
}
}
}
}
&.chat {
flex-direction: column;
header {
position: relative;
display: block;
width: 100%;
padding: 50px 30px 10px;
.logout {
position: absolute;
top: 15px;
right: 15px;
appearance: none;
border: none;
outline: none;
background: none;
color: #FFF;
font-size: 18px;
margin-bottom: 10px;
text-align: right;
}
h1 {
color: #FFF;
}
}
.chat-box {
border-radius: 24px 24px 0px 0px;
background-color: #FFF;
box-shadow: 0px 0px 12px rgba(100, 100, 100, 0.2);
flex: 1 1 100%;
padding: 30px;
.message {
display: flex;
margin-bottom: 15px;
.message-inner {
.username {
color: #888;
font-size: 16px;
margin-bottom: 5px;
padding-left: 15px;
padding-right: 15px;
}
.content {
display: inline-block;
padding: 10px 20px;
background-color: #F3F3F3;
border-radius: 999px;
color: #333;
font-size: 18px;
line-height: 1.2em;
text-align: left;
}
}
&.current-user {
margin-top: 30px;
justify-content: flex-end;
text-align: right;
.message-inner {
max-width: 75%;
.content {
color: #FFF;
font-weight: 600;
background-color: #ea526f;
}
}
}
}
}
footer {
position: sticky;
bottom: 0px;
background-color: #FFF;
padding: 30px;
box-shadow: 0px 0px 12px rgba(100, 100, 100, 0.2);
form {
display: flex;
input[type="text"] {
flex: 1 1 100%;
appearance: none;
border: none;
outline: none;
background: none;
display: block;
width: 100%;
padding: 10px 15px;
border-radius: 8px 0px 0px 8px;
color: #333;
font-size: 18px;
box-shadow: 0px 0px 0px rgba(0, 0, 0, 0);
background-color: #F3F3F3;
transition: 0.4s;
&::placeholder {
color: #888;
transition: 0.4s;
}
}
input[type="submit"] {
appearance: none;
border: none;
outline: none;
background: none;
display: block;
padding: 10px 15px;
border-radius: 0px 8px 8px 0px;
background-color: #ea526f;
color: #FFF;
font-size: 18px;
font-weight: 700;
}
}
}
}
}
|
登陆模块
定义默认提交进入的方法 @submit.prevent=”Login” 绑定事件
定义登陆时,输入框中输入的信息所绑定的变量(导入vue的ref) const inputUsername = ref(“”);
登录时,将输入框中的值对应的信息保存数据库中,否则下次登陆系统后,以前的信息(包括用户名与消息)都不会保存起来(导入vue的reactive响应变动)
- JS中的setup中配置相应的变量与方法(记得返回这些数据让页面显示可以使用)
1
2
3
4
5
6
7
8
9
10
11
12
13
14
15
16
17
18
19
20
21
22
23
24
25
26
27
28
29
| import { reactive, onMounted, ref } from 'vue';
import db from './db';
export default{
setup () {
const inputUsername = ref("");
const state = reactive({
username: "",
messages: []
});
const Login = () => {
if(inputUsername.value != "" || inputUsername.value != null){
state.username = inputUsername.value;
inputUsername.value = "";
}
}
return{
inputUsername,
Login,
state
}
}
}
|
- 页面显示
1
2
3
4
5
6
7
8
9
10
11
12
13
14
15
16
17
18
19
20
21
22
| <template>
<div class="view login" v-if="state.username === '' || state.username === null">
<form class="login-form" @submit.prevent="Login">
<div class="form-inner">
<h1>Login to FireChat</h1>
<label for="username">Username</label>
<input
type="text"
v-model="inputUsername"
placeholder="Please enter your username..." />
<input
type="submit"
value="Login" />
</div>
</form>
</div>
<div class="view chat" v-else>
<h1> 这是聊天室显示区域 </h1>
</div>
</template>
|
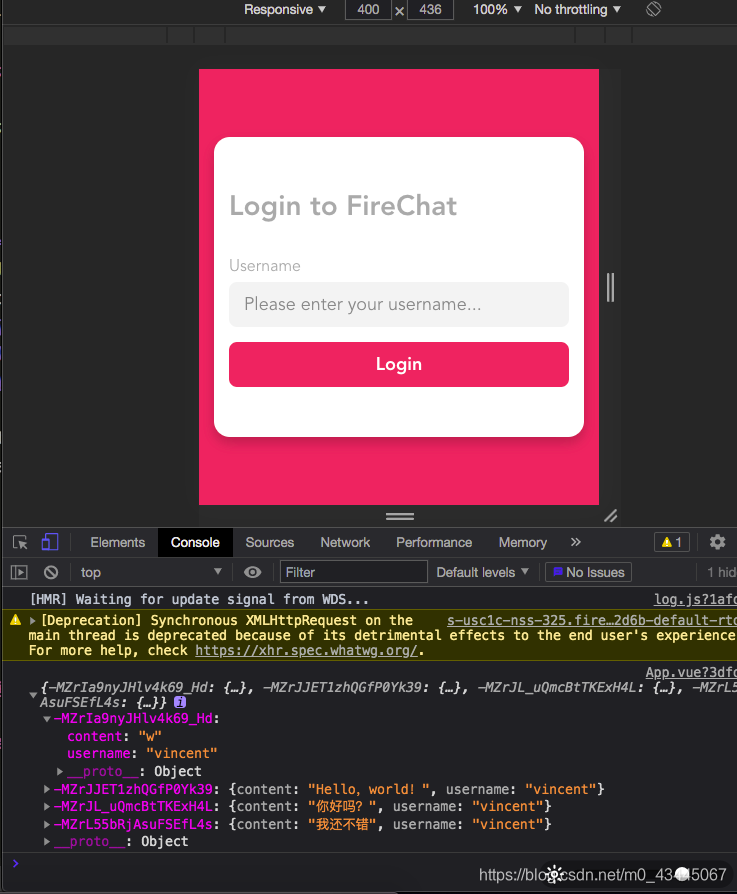
用户界面效果图,如下图所示:
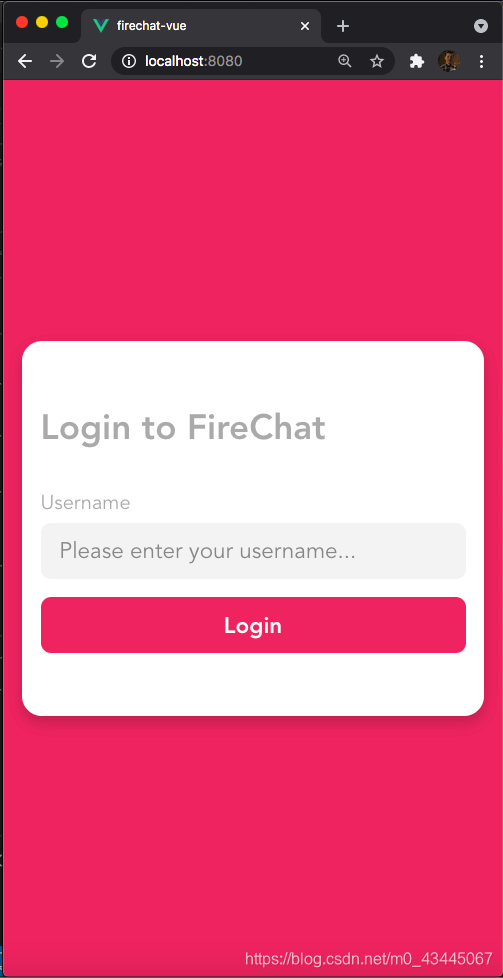
可以看到,我们使用了v-if进行判断
如果存储在state中的用户名信息不为空(即表示用户填入了信息想进入聊天室)
则显示这是聊天室显示区域 否则会显示登陆区域让用户进行登陆(由于是在线聊天室,不设置密码)
- 从聊天室中注销出来
刚才我们模拟进入了聊天室,现在我们添加注销功能
1
2
3
4
5
6
| <div class="view chat" v-else>
<header>
<button class="logout" @click="Logout">Logout</button>
<h1>Welcome, {{ state.username }}</h1>
</header>
</div>
|
前端页面写好了,补充JS中的Logout方法,还是写在setup中
1
2
3
4
5
6
7
8
9
10
| const Logout = () => {
state.username = "";
}
return{
...Login,
state,
Logout
}
|
前面提到了,当state中的username为空或者为null时,会显示登陆区域。
- 为聊天室添加(发送消息,查看消息功能)
这是最后一个步骤了,也是需要用到firebase(特别是我们刚才配置的实时数据库)的一步
首先在刚才注销区域<header>标签 的下方,加入代码:
1
2
3
4
5
6
7
8
9
10
11
12
13
14
15
16
17
18
19
20
21
22
23
| <section class="chat-box">
<div
v-for="message in state.messages"
:key="message.key"
:class="(message.username == state.username ? 'message current-user' : 'message')">
<div class="message-inner">
<div class="username">{{ message.username }}</div>
<div class="content">{{ message.content }}</div>
</div>
</div>
</section>
<footer>
<form @submit.prevent="SendMessage">
<input
type="text"
v-model="inputMessage"
placeholder="Write a message..." />
<input
type="submit"
value="Send" />
</form>
</footer>
|
可以看到,我们用到了SendMessage方法用来发送数据
用到了state中的messages并且将当前用户的前端样式区别于其他用户
并且从messages中取出所有消息 利用v-for在前端中显示
输入的消息绑定v-model inputMessage
那么,下面就可以定义消息变量以及相应发送消息的函数!
还是写在setup中 并注意return给前端使用
1
2
3
4
5
6
7
8
9
10
11
12
13
14
15
16
|
const inputMessage = ref("");
const SendMessage = () => {
const messagesRef = db.database().ref("messages");
if(inputMessage.value === "" || inputMessage.value === value){
return;
}
const message = {
username: stae.username,
content: inputMessage.value
}
messageRef.push(message);
inputMessage.value = "";
}
|
那么,到目前位置,我们写入数据库的操作就写完了。
因此,下一步我们需要,在进入聊天室时,将数据库中的数据赋给state
- firebase检索数据(写在onMounted钩子函数中)
1
2
3
4
5
6
7
8
9
10
11
12
13
14
15
| onMounted(() => {
const messagesRef = db.database().ref("messages");
messagesRef.on('value', snapshot => {
const data = snapshot.val();
let messages = [];
Object.keys(data).forEach(key => {
messages.push({
id: key,
username: data[key].username,
content: data[key].content
});
});
state.messages = messages;
});
});
|
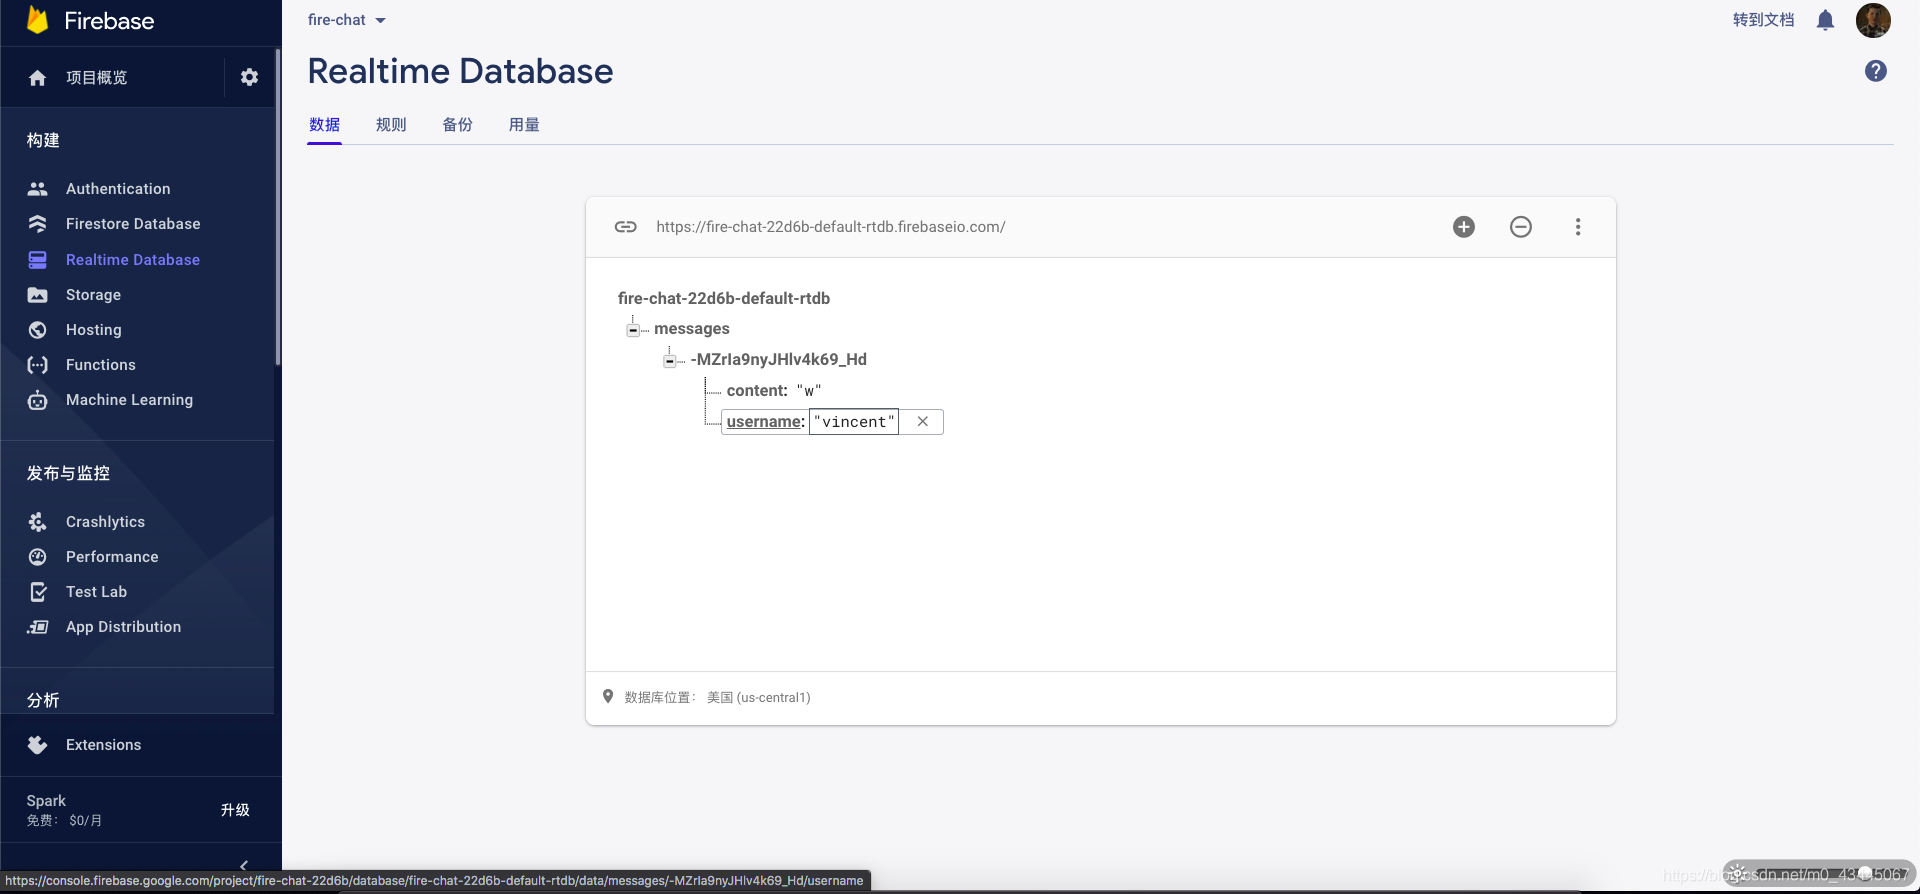
其中,data是我们从数据库中查询到的所有数据。
如果我们试着打印以下内容,你会发现:
因为,Firebase中存储的信息都是JSON对象,那么,我们就要用相应的方法来遍历每个对象,并将所有对象存储在messages中
最后将messages的内容,赋给我们的state 好让我们的v-for循环遍历数据可以生效!
并且值得注意的是,每次有新的内容添加至数据库时(即每次发送消息时)
- 这个messagesRef.on(‘value’, …) 都会被调用一次,我们可以看成是事件监听(每当有新的数据时,会被调用!)
文末总结
P.S. 该文所有的代码以及教程均来自YT博主(非自己原创)只不过自己以文字思路的形式写成笔记而已
点我查看源码地址
点我查看视频教学
如果哪里有写的不对的地方,多多包涵,请于文章下方的评论区告知,谢谢!